

How to check and change transmission fluid

The health of your vehicle’s transmission is crucial for its optimal performance, and one of the most significant factors in maintaining this health is ensuring the quality of the transmission fluid. This specialized fluid serves multiple purposes, including lubricating various components, reducing friction, and facilitating smooth gear shifts. Neglecting to check and change your transmission fluid can lead to severe issues, including transmission failure, which can be costly to repair.
This guide will walk you through the essential steps to check and change your transmission fluid. Understanding how and when to perform this maintenance task will not only enhance your vehicle’s longevity but also improve its overall efficiency. Regular fluid checks can help identify problems before they escalate, giving you the peace of mind that your vehicle remains in top-notch condition.
By following this guide, you’ll be equipped with the knowledge to assess the condition of your transmission fluid and execute a fluid change if necessary. Whether you are a seasoned car enthusiast or a novice car owner, knowing how to manage your transmission fluid is an invaluable skill that contributes to your vehicle’s reliability and performance.
How to Inspect Transmission Fluid Levels Safely
Checking your vehicle’s transmission fluid is a crucial aspect of regular maintenance. Proper fluid levels ensure smooth operation and longevity of your transmission. Follow these steps to inspect transmission fluid levels safely:
1. Prepare Your Vehicle: Start by parking your vehicle on a level surface. This prevents any false readings due to incline. Ensure that the engine is warm, as this allows for accurate fluid level measurement. Run the engine for a few minutes, then turn it off.
2. Engage Safety Features: Always engage the parking brake to prevent any unintended movement. If necessary, use wheel chocks for additional safety.
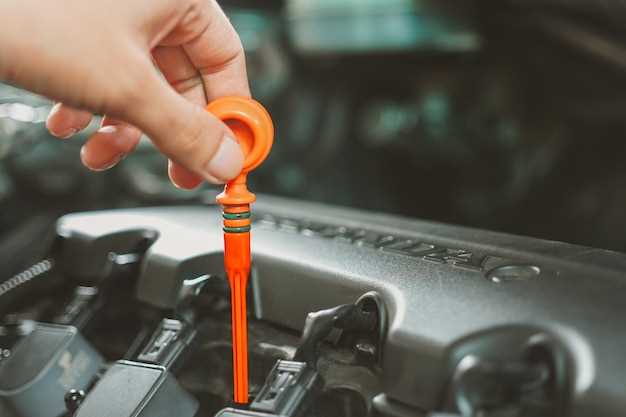
3. Access the Dipstick: Locate the transmission fluid dipstick, typically found near the back of the engine bay. Depending on your vehicle, you might need to remove a cover to gain access. Be sure to have a clean cloth or paper towel ready for the next step.
4. Check Fluid Level: Remove the dipstick and wipe it clean. Reinsert the dipstick fully, then remove it again to check the fluid level. The dipstick will have markings indicating the appropriate level. Ensure the fluid reaches the correct mark while keeping safety in mind.
5. Assess Fluid Condition: While checking the level, observe the fluid’s color and consistency. Healthy transmission fluid is usually a bright red or pink. If the fluid appears dark or has a burnt smell, this may indicate degradation and the need for maintenance.
6. Replace and Clean: After inspecting, reinsert the dipstick securely. If necessary, clean any spills and ensure that all tools are put away safely. It’s advisable to perform this check regularly as part of your vehicle maintenance routine.
Remember, if you detect any issues with the fluid–like low levels or poor condition–consider consulting a professional to prevent potential transmission damage.
Step-by-Step Process for Changing Transmission Fluid
Changing your vehicle’s transmission fluid is an essential part of regular maintenance that helps ensure the smooth operation of your transmission. Follow this detailed guide to perform the task efficiently.
Step 1: Gather Your Supplies
Before starting, you need to collect the necessary tools and materials. These include:
- New transmission fluid (check your owner’s manual for the correct type)
- Transmission filter (if applicable)
- Drain pan
- Socket wrench
- Funnel
- Rags
- Jack and jack stands (if needed)
Step 2: Prepare Your Vehicle
Park your vehicle on a level surface and engage the parking brake. If your vehicle has low clearance, use a jack to lift it and secure it with jack stands for safety.
Step 3: Drain the Old Fluid
Locate the transmission drain plug, usually found at the bottom of the transmission pan. Place the drain pan underneath the plug, then use the socket wrench to remove it. Allow the old fluid to completely drain. Be cautious, as the fluid may be hot.
Step 4: Replace the Transmission Filter
If your vehicle has a transmission filter, now is the time to replace it. Remove the bolts holding the transmission pan in place using the socket wrench. Carefully detach the pan and remove the old filter. Install the new filter, ensuring a proper fit, and then reattach the transmission pan with new gasket material if necessary.
Step 5: Add New Transmission Fluid
Once the old fluid and filter have been replaced, it’s time to add the new transmission fluid. Locate the fluid fill tube, usually marked with a dipstick. Using a funnel, pour in the appropriate amount of new transmission fluid as specified in your owner’s manual.
Step 6: Check Fluid Levels
Start the engine and let it run for a few minutes, cycling through all gears to ensure the new fluid circulates properly. With the engine still running, check the fluid level using the dipstick and add more fluid if necessary.
Step 7: Dispose of Old Fluid
Properly dispose of the old transmission fluid and any used materials. Many auto parts stores or recycling centers offer disposal services for hazardous fluids.
Following these steps will help maintain your vehicle’s transmission, ensuring it operates efficiently and prolonging its lifespan.
Identifying Signs of Transmission Fluid Issues

Recognizing the early signs of transmission fluid problems is crucial for the maintenance and longevity of your vehicle. One of the first indicators is a change in the color and smell of the fluid. Healthy transmission fluid is usually a bright red or pink hue, whereas fluid that appears brown or has a burnt odor may signal contamination or overheating.
Another common symptom is slipping gears, where the transmission unexpectedly shifts between gears or has difficulty engaging. This can lead to reduced performance and may indicate that the fluid is low or degraded.
Strange noises, such as whining or clunking sounds when shifting, are also warning signs. These noises often arise from insufficient lubrication within the transmission system, which can be addressed through proper fluid maintenance.
Additionally, if you notice any fluid leaks under your vehicle, it’s important to investigate promptly. Transmission fluid typically has a reddish tint, and leaks can significantly impact performance if not addressed. Regularly checking for fluid levels and conditions should be part of your vehicle’s maintenance routine to prevent further complications.
Lastly, delayed or erratic shifting can indicate transmission fluid issues. If the vehicle hesitates before changing gears or shifts unpredictably, it might be time to check the fluid levels and condition. Prompt attention to these signs can help ensure reliable vehicle performance and extend the life of the transmission.