

How to repair a flat tire at home

Dealing with a flat tire can be a frustrating experience, especially when you’re far from a service station. However, learning how to repair a tire at home can save you time and money. In this guide, we’ll walk you through the essential steps to effectively address a flat tire, ensuring you’re back on the road in no time.
Flat tires can occur for various reasons, including punctures from sharp objects or a slow leak from wear and tear. Understanding how to diagnose the issue and perform a proper repair will not only give you confidence in your DIY skills but also equip you with the knowledge to handle similar situations in the future.
In this step-by-step guide, we will provide you with straightforward instructions and practical tips to make your tire repair process smooth and efficient. Whether you’re a seasoned mechanic or a novice car owner, you’ll find this guide helpful and easy to follow.
Repair a Flat Tire at Home: Simple Step by Step Guide
Having a flat tire can be a frustrating experience, but repairing it at home is a straightforward DIY project. Follow these simple steps to effectively repair your flat tire and get back on the road.
Step 1: Gather Your Tools
Before starting the repair, collect all necessary tools. You will need a tire repair kit (which typically includes tire patches, adhesive, and tools), a jack, and a wrench to remove the wheel. Ensure you have safety glasses and gloves to protect yourself during the process.
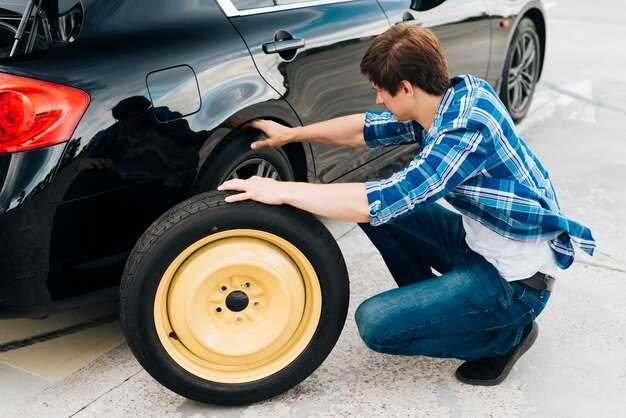
Step 2: Remove the Wheel
First, locate the jack points on your vehicle and securely place the jack under the car. Raise the vehicle until the tire is off the ground. Use the wrench to remove the lug nuts, then take off the flat tire and set it aside for repair.
Step 3: Inspect the Tire
Carefully examine the tire for visible punctures, cracks, or any damage. Make sure to check the tread area and sidewalls. If you find any foreign objects like nails or screws, note their location for the repair process.
Step 4: Clean the Damage Area
Using a wire brush or sandpaper, clean the area around the puncture. This helps ensure that the patch adheres properly. Remove any debris or dirt from the damaged area and make sure the surface is dry before proceeding.
Step 5: Apply the Patch
Follow the instructions on your tire repair kit. Typically, you will need to apply adhesive around the puncture and place the patch over it. Press firmly to ensure a strong bond. Allow the adhesive to cure for the recommended time as specified in your kit.
Step 6: Reinstall the Tire
Once the repair is complete and the patch is set, it’s time to put the tire back on the vehicle. Align the tire with the wheel hub and secure it with lug nuts, tightening them in a star pattern to evenly distribute pressure. Lower the car back to the ground using the jack.
Step 7: Test the Repair
After reinstalling the tire, inflate it to the recommended pressure. Check for any signs of air leakage by applying soapy water to the patch and watching for bubbles. If everything looks good, take your vehicle for a short test drive to ensure the repair holds.
By following these steps, you can efficiently repair a flat tire at home and save time and money. Regularly check your tires for wear and tear to help prevent future flats.
Gather Necessary Tools and Materials for Tire Repair
When tackling a flat tire repair at home, having the right tools and materials is essential for a successful DIY operation. Below is a list of what you will need:
- Tire Repair Kit: This typically includes patch kits, rubber plugs, and various tools for applying them.
- Tire Pressure Gauge: To check the tire pressure before and after the repair.
- Air Compressor or Tire Inflator: Essential for reinflating the tire once repairs are complete.
- Jack: A reliable car jack will lift your vehicle to access the flat tire.
- Lug Wrench: Used to remove and replace the lug nuts on the wheel.
- Utility Knife: Helpful for removing debris or trimming any excess material from the puncture site.
- Soapy Water Solution: To locate leaks by applying the mixture to the punctured area and observing for bubbles.
Having these tools readily available will streamline the tire repair process and ensure that you can effectively address the flat tire.
It is also advisable to wear gloves and safety glasses for protection during the repair process.
Identify and Patch the Puncture in Your Tire
To effectively repair a flat tire, the first step is to identify the puncture. Begin by visually inspecting the tire for any obvious holes or tears. Additionally, listen for hissing sounds that may indicate air escaping. If these methods are inconclusive, you can use soapy water, applying it to the surface of the tire; bubbles will form at the puncture site, revealing the location.
Once the puncture is located, clean the area around it thoroughly. Remove any debris, dirt, or foreign objects to ensure that the patch adheres properly. Use a tire repair kit that typically includes a reaming tool and rubber patches. Insert the reaming tool into the puncture, twisting it to create a rough surface for better adhesion.
Next, apply a sufficient amount of rubber cement or adhesive to the patch and the surrounding area of the tire. Carefully place the patch over the puncture, pressing firmly for a few seconds to secure it in place. Make sure there are no air pockets between the patch and the tire.
After the patch is applied, allow it to cure for the recommended time according to the patch kit instructions. Once cured, reinflate the tire to the manufacturer’s recommended pressure. Finally, inspect the patch to ensure a secure repair before reattaching the tire to your vehicle. This DIY method allows you to efficiently manage a flat tire with minimal tools and costs.
Properly Reinflate and Reinstall the Tire on Your Vehicle

After successfully repairing a flat tire, the next crucial steps are reinflation and reinstallation. Start by checking the recommended pressure for your vehicle’s tires, which can typically be found on a sticker inside the driver’s door or in the owner’s manual. A proper DIY reinflation process ensures safety and performance.
Using a tire pressure gauge, check the current pressure of the repaired tire. If it has dropped significantly, it’s time to reinflate. Attach an air compressor or a portable tire inflator to the valve stem, ensuring a tight seal. Turn on the compressor and monitor the pressure with the gauge, adding air until it reaches the recommended level.
Once the tire is properly inflated, inspect it for any leaks or abnormalities. It’s advisable to listen for hissing sounds or apply soapy water to check for bubbles. After confirming the tire is sound, it’s time to reinstall it onto your vehicle.
Position the tire in line with the wheel hub and align the holes of the rim with the lug bolts. Push the tire gently into place. Start threading the lug nuts by hand to ensure they are not cross-threaded. Once they are all in place, use a lug wrench to tighten the nuts in a criss-cross pattern. This ensures even distribution of pressure and secures the tire properly.
Finally, lower the vehicle back to the ground and give the lug nuts one last tightening, ensuring they are appropriately secured. This process of reinflating and reinstalling a flat tire is not only DIY-friendly but essential for maintaining your vehicle’s safety and efficiency on the road.